Quentin's e-Portfolio
Recipes of Tips, Tricks, and Links
Chefs have their favourite recipes that they will go back to time and time again. This page is a compliation of resources that I have found helpful as I navigated through the MET program. This is not meant to be a comprehensive list but rather a list of a few of my favourite tools! I hope you find something of value here!
For each site, I've looked at it through the lens of Bates and Poole's (2004) SECTIONS model (which is also explained below).
Please note, that the corporate logos and icons represented and shared on this page are registered to their respective organizations and require their permission for use. My use falls under Fair Dealing of the Copyright Act of Canada.
Google Drive / Google Apps for Education
When Google Docs launched a number of years ago I was pretty excited about the affordances of this technology. Not all students had (or have) access to word processing software such as Microsoft Office. There were a few open source tools available but they were severely lacking in full functionality. When Google Docs emerged it quickly became apparent that this was an effective tool that would have all the features of a standard office suite with the benefit of being fully online. Google Drive works across platforms and devices.
Now, Google Drive includes not only a document creation tool, but spreadsheets, forms, slides, drawings, and 100+ more apps. You can upload and save PDF files. The list goes on and on. But, the most powerful and salient feature is the ability to collaborate with others synchronously and asynchronously. This is what I have used it for in my own learning and the best part of using it with my own classes. My students enjoy collaborating on a variety of project plans and projects using Google Drive.
Our school use of Google Drive is supported by Google Apps for Education (GAFE) initiative. All the features of Drive are included with the bonus of having our students signed up with their own email using our school domain name. Moreover, our IT administrator is able to monitor and administer any issues with the accounts. If your school or classroom has not made use of this feature yet, I strongly recommend it!
Video Making / Editing
In today’s multimedia age, making a movie is not a matter of “if” but “when.” Educators should know how to make and edit their own movies before assigning them as projects (or part of projects) to their students. It is then that you will understand the process and amount of time it will take to plan, film, and edit a quality movie.
The nice thing is you can shoot a decent movie on nearly any device. For most work that students will do, a mobile device will suffice. Of course you can always use built in cameras on iPads and laptops as well as do screen recordings.
So what are the tools available?
I did not know this for a long time, but you can do screen recordings using QuickTime. This is the best, free option available. It uses your computer’s built in camera and microphone.
If you have access via your institution or are willing to spend some money, get Camtasia.
Unbeknownst to me until very recently, this great tool was available to me as a UBC student. I’ve downloaded it and love the features and ease of use. This is a great tool for doing full screen recordings. You can embed different audio and video clips and overlay text and images easily into the video. Finally, the built in editor is easy to use.
iMovie and Final Cut Pro
Before I started using Camtasia, I relied heavily on iMovie and Final Cut Pro. iMovie comes on every Mac and iPad. iMovie is easy to use and comes with a lot of built in templates that are fun for students of all ages to use. The click and drop features increase the functionality of the tool. You can also make audio and image adjustments as needed. If you want to fine-tune things a bit more, then Final Cut Pro is for you. This software allows for detailed audio, image, and video editing. Use this tool to create a high end, polished product.
Website Creation Tools
There are a lot of great online tools that make creating a website pretty easy. I've tried quite a few out, and recommend you try them too!
Each has their own pros and cons, but I think it is valuable to have a broad range of experience in using different tools.
This is what this ePortfolio is built with. This was my first time using Wix and I am impressed with its ease of use and reliability. It was quit easy to learn how to build pages and layouts. The default page layouts are quite extensive and aid in speedily building a site that looks and works well. There are lot of great built-in templates which is what attracted me to Wix. One downside is the lack of a spell checker within Wix. This means that a lot of your writing needs to be done on an external program then copied and pasted to the site which leads to some odd formatting issues.
Another issue is in regards to embedding documents. Ideally, I would have used Scribd, but the functionality was off.
Finally, at this time Wix does not allow users to back up and export their own website data which is a major problem.
This is another great free tool to build great looking websites. I have used it once and was impressed with how easy it is to insert a range of elements within the pages. It, too, is relatively easy to learn how to navigate and build. There are a limited number of templates to use, but I find that most templates look essentially the same.
Surprisingly editing in Google Sites is more difficult than you would imagine. However, once you manage to find some of the trickier settings such as layout options, the rest of the process is quite seamless. Google does have an excellent training centre to help you. If you use Google Drive, it is quite handy to migrate all of your documents over.
Although a wikispace functions differently than a website, if you are looking to increase communication and user interactivity with your website, building a wiki may be the option. I really like using Wikispaces for those reasons. It is also really easy to design and build a range of elements within the pages such as discussion forums, media elements, etc. Overall, for a simple, interactive web presence, wikispaces can be the way to go.
Organization / Notetaking
When I switched from PC to Mac, I was a bit lost without using Microsoft One Note. I had become accustomed to using it to do some planning and organizing. I quickly found a new tool called Evernote. However, it wasn’t until I was taking ETEC 500 that I really began to see the power of Evernote. I now use it for staying organized, taking notes, clipping items from the web, etc. It works across platforms. You can even collaborate with it which I tried with some limited success with my History 12 class this past school year.
You can even use it to present your ideas.
Overall, Evernote has a lot of functions and will aid you in being organized.
When social bookmarking first emerged, I was intrigued and a heavy user of Delicious. I enjoyed the idea of being able to bookmark websites without having it tied to a specific computer. However, when Delicious was sold and seemed to have gotten lost in 2011, I needed to find a new place. Diigo was that place.
Diigo has grown to become more than just a bookmarking tool. With tags and a searchable database, I often start with Diigo to find ideas to get me going on a particular project. Diigo also allows for annotating web pages that you save via tools such as a highlighter, sticky note, and and outliner tool.. You can share specific links or groups of links with a particular group of people. I use this tool with my classes as a way to promote effective web research.
Our school got a trial license for Noodle Tools a few years ago. At first I thought it was really good at making bibliographies. And it does that in all the major styles! But, Noodle Tools is much more than that. It is a one-stop shop for note-taking, outlining, citation, research annotations, and collaborative research and writing. By using this tool, students need to implement effective research techniques and move beyond copy-and-paste methods of research. Using the tools allows them to read and sift the information from a range of sources while acknowledging other’s work. Once you build your notes, it helps you build an outline which you can easily export to Google Docs
Other key features (and these are free to anyone!) include the fact that you can create a bibliography/works cited page from beginner (elementary) all the way to university level.
I have used this tool on a number of my projects and found it to be very effective in keeping me organized and building an error-free references page.
Creative Expressions
There is an array of options for creatively sharing your work available online. Adam Levine’s 50 Ways to Tell A Story is a great place to start. On the wiki, he provides updates and the same story told using 50 different tools.
Check it out!
I’m not going to highlight 50 tools. I’ll focus on a few that I’ve tried and liked.
I was introduced to Easelly this past year. This is an online tool for making infographics. Infographics are a great way to illustrate ideas, numbers, connections, etc. Easelly makes this a painless process. There are numerous templates to use to get started and it is easy to use. I have used this with my own students and they have commented that it is, indeed, easy to use!
Powtoon is an online presentation software tool that allows you to create animated videos. It is intuitive to to use with a lot of simple drag-and-drop functionality. There is a built in tutorial which will help you along the way. They also have an extensive suite of tutorial videos on a range of topics. You can simply get an account my adding PowToon as an app to your Google Drive suite of apps.
I remember the first time seeing Prezi being used and was astounded at how cool it was and how it immediately engaged the audience. Prezi is a great presentation tool that works for in-class presentation and even as stand-alone presentations. It is eye-catching with its zooming interface. However, a word of caution is in order. Overuse of the zooming features can be a bit overwhelming for viewers. That said, effective use of this tool along with some really great templates, makes for a fantastic presentation tool.
Selecting & Using Technology
With technology developing a rapid pace, it is important to have a good framework in place in order to select appropriate technologies. Bates and Poole (2004) have developed an easy-to-use framework based on sound theory and research.
This is a tool that I used extensively in ETEC 565A and used it in other courses as well. It covers the key issues that educators need to consider when making technological decisions. Here is an explanation of their model known by the acronym SECTIONS:
S Students: what is known about the students or potential students and the appropriateness of the technology for this particular group or range of students?
E Ease of use and reliability: how easy is it for both teachers and students to use? How reliable and well tested is the technology? C Costs: what is the cost structure of each technology? What is the unit cost per learner?
T Teaching and learning: what kinds of learning are needed? What instructional approaches will best meet these needs? What are the best technologies for supporting this teaching and learning?
I Interactivity: what kind of interaction does this technology enable?
O Organizational issues: What are the organizational requirements and the barriers to be removed before this technology can be used successfully? What changes in organization need to be made?
N Novelty: How new is this technology?
S Speed: how quickly can courses be mounted with this technology? How quickly can materials be changed?
The article does give more detail for each section, but this overview gives you a sense of the key questions that educators should be focusing on when buying/using technology. I appreciate this model for its holistic approach. It does not focus on novelty or speed as primary factors and it also considers real-world situations that educators face within organizations, including budget restraints.
This is a model that I have used with the IT coordinator at my school in making some decisions around some of our purchases to supplement our teaching. I highly recommend reading this article!
Theory and Practice of Online Learning
The Theory and Practice of Online Learning is a must read for anyone involved in online learning and teaching. This book, available online, free of charge from Athabasca University, covers all essential areas of online teaching and learning. You can choose to download the entire book or simply the chapters you wish to peruse.
I have found two chapters to be particularly useful for my teaching and in developing my own course websites. They are authored by Terry Anderson and are titled, Towards a Theory of Online Learning and Teaching in an Online Context.
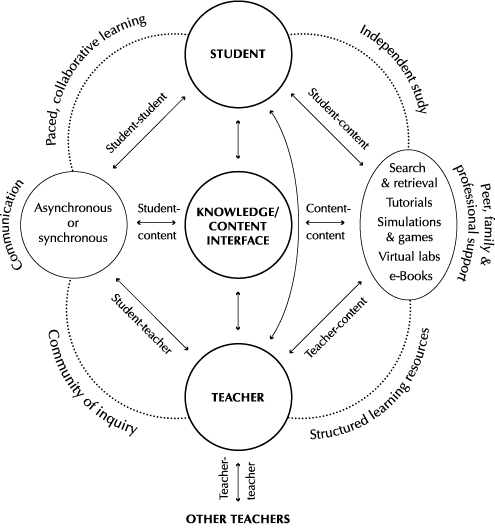
In the first chapter, Anderson (2008a) outlines the essential framework for teaching that I often refer to. Anderson (2008a) highlights that education must learning-, knowledge-, assessment-, and community-centered while considering the interactions that happen which include the following: learner-learner, learner-teacher, learner-content, teacher-content, teacher-teacher, content-content. His model then overlaps these two key aspects in a visual manner so that we can see how all of these interactions correlate and are co-dependent for an effective educational environment for everyone involved. This model does not set out guidelines for choosing a medium or a formula but it does provide a framework to assess those decisions. As Anderson (2008a) states “teachers must learn to develop their skills so that they can respond to student and curriculum needs by developing a set of online learning activities that are adaptable to diverse student needs.” This model (seen to the right [or below on mobile]) definitely helps in doing that.
The other chapter that I have referred to is Anderson’s Teaching in an Online Context. This chapter is particularly relevant in designing online learning spaces. Anderson (2008b) focuses on the importance of community and the steps a teacher needs to take to foster the community particularly within an an online environment. As I’ve noted elsewhere, this notion of community is something that I believe to be of paramount importance in establishing in our classrooms, regardless of context. Anderson does well in setting out some key ideas in aiding in this process.

Anderson, T. Model of Online Learning
International Society for Technology in Education
The ISTE Standards define the new skills and pedagogical insights educators need to teach, work and learn in the digital age (ISTE). The five standards with clear expectations aid me in ensuring that I am doing what I should do to engage my students by being a good role model of the effective use of technology. I encourage all teachers to read, reflect, and self-assess using these standards to ensure that they are growing as lifelong learners and professionals.
Proudly created with Wix.com


